

Issue Let's Encrypt SSL/TLS certificate with acme.sh (Nginx)
Learn how to acquire an SSL/TLS certificate and enable HTTPS on Nginx step-by-step guide


Without SSL/TLS, any information transmitted between your website and your visitors' browsers is sent in plain text and can be intercepted by malicious actors.
In addition to providing security benefits, using SSL/TLS can also improve the trustworthiness of your website. Visitors are more likely to trust a website that displays the padlock icon and "https" in the address bar, indicating that the website has a valid SSL/TLS certificate.
Acquiring an SSL/TLS certificate and enabling HTTPS on your web server can be a time-consuming and error-prone process. In this article, we will go through the certificate request, Nginx configuration and finally we will rate the SSL/TLS security.
Before we start
Before proceeding with the setup, you should have the following components ready:
A Virtual Private Server (VPS) with a static IP address. There are many cloud providers, such as Vultr, that offer this kind of service. While this guide is specifically for
Ubuntu 22.04.2 LTS, will likely work for other Ubuntu versions as well.A DNS domain with an A DNS record pointing to the IP address of your VPS. If you don't already have a domain, you can register one for a reasonable price of around $10-15 per year.
Please note that setting up these components is beyond the scope of this post. You will need to have them ready before proceeding with the steps outlined in this guide.
Set up Nginx
Log in on your VPS and Install Nginx:
sudo apt install nginx -y
During the certificate request and renewal, we need to prove to Let's Encrypt that we own the host. The proof consists of exposing a web page on port 80 that contains a secret (or challenge) that only Let's Encrypt knows. We will now configure Nginx to host the challenge that will be generated during the certificate request.
Create a Let's Encrypt site:
sudo mkdir -p /var/www/html/letsencrypt/
After that, let's set up an Nginx "catch-all" configuration:
sudo vim /etc/nginx/sites-available/letsencrypt.conf
Copy-paste the following:
server {
  server_name _;
  listen 80;

  index index.html;
  root /var/www/html/letsencrypt/;

  access_log /var/log/nginx/letsencrypt-access.log;
  error_log /var/log/nginx/letsencrypt-error.log error;

  # allow access to acme-challenges
  location /.well-known/acme-challenge/ {
  }
  # deny everything that doesn't match another location
  location / {
    deny all;
  }
}
The configuration denies all the traffic except that directed to the folder: .well-known/acme-challenge/, the one that Let's Encrypt will visit.
It would have been much better to allow a specific range of Let's Encrypt IPs at the firewall level but this is not possible as Let's Encrypt changes them continuously (more on that here).
Disable the default Nginx website and enable the one we have just created:
sudo rm /etc/nginx/sites-enabled/default
sudo ln -s /etc/nginx/sites-available/letsencrypt.conf /etc/nginx/sites-enabled/letsencrypt
The Nginx configuration is ready, we can now reload the service:
sudo systemctl reload nginx
Important: In this guide, we will always use reload over restart. The restart command is equivalent to stop + start, this will stop the process and start a new one. As you can imagine, between a stop and a start there is downtime where Nginx doesn't handle HTTP requests. Nginx has been designed to be a highly available service and resilient to configuration errors, for this reason, it supports also the reload command. When you issue a reload to the Nginx service, you force it to reload the configuration without killing the process. Only if the configuration is correct will be deployed otherwise it will keep the old one continuing to serve requests. This mechanism allows Nginx to reload SSL/TLS certificates without downtime (more on that later).
Finally, open the HTTP traffic to the world:
sudo ufw allow http
Install acme.sh
ACME stands for Automated Certificate Management Environment, it is a standard protocol for automated domain validation. Acme.sh is a command line bash script that interacts with Certificate Authority (like Let's Encrypt) to issue and renew SSL/TLS certificates. We will now go through the installation of "acme.sh" and the certificate request. All the commands reported in this section (and the next one) are written without sudo in the front because are supposed to be run using the root user.
sudo su # getting root privileges
cd ~
curl https://get.acme.sh | sh -s email=your@email.com
# logout and login again, this will force the source of the bashrc making acme.sh available in your path
exit
sudo su
I recommend setting a valid email as Let’s Encrypt will use it to send renewal and revoke notices.
The installing procedure will make the acme.sh script available in your path and a cron job will be added to renew the certificates. Check it out with:
crontab -l
Get an SSL/TLS certificate from Let’s Encrypt
We can now request an SSL/TLS certificate to Let's Encrypt:
acme.sh --server letsencrypt --issue -d adomain.com -w /var/www/html/letsencrypt/
During the command execution, acme.sh will create a challenge for Let's Encrypt stored in the /var/www/html/letsencrypt/.well-known/acme-challenge/, meanwhile, Let's Encrypt will visit that location. The challenge is deleted right after, so it's not easy to catch it, however, you can have a look at the Nginx access logs to verify Let's Encrypt visit:
more /var/log/nginx/letsencrypt-access.log
Note: It is possible to add other domains to get one certificate for them all, just add multiple -d parameters to the command: -d adomain.com -d sub.adomain.com.
Note 2: Let's Encrypt limits the number of requests to issue a certificate and will block you if fail too many times this step. To prevent that, you can test against a staging environment provided by Let's Encrypt. This will allow you to get things right before issuing trusted certificates and reduce the chance of your running up against rate limits. Set the --server parameter as https://acme-staging-v02.api.letsencrypt.org/directory to use the staging environment.
If you arrived at this point, you successfully obtained an SSL/TLS from Let's Encrypt! Before configuring Nginx for HTTPS, we need to install the certificate on your VPS. The certificate is now stored in the /root/.acme.sh/adomain.com/ directory along with the acme configuration for the adomain.com domain. Nginx will use a copy of it stored in the /etc/ssl/private/ and /etc/ssl/certs/ directories:
mkdir -p /etc/ssl/private/ /etc/ssl/certs/
acme.sh --install-cert -d adomain.com --key-file       /etc/ssl/private/adomain.com.key --fullchain-file /etc/ssl/certs/adomain.com-fullchain.cer --reloadcmd "systemctl reload nginx"
The command will install the certificate and reload the Nginx service. This configuration is saved by acme.sh and repeated by the cron job and each certificate renewal.
Configure Nginx with SSL/TLS certificate
We will now create a site for the domain: adomain.com and serve content over HTTPS. Create the home directory for the site and landing page:
sudo mkdir -p /var/www/html/adomain.com/
sudo sh -c 'echo "Hello HTTPS!" > /var/www/html/adomain.com/index.html'
Prepare the Nginx SSL configuration:
sudo mkdir -p /etc/nginx/includes/
sudo vim /etc/nginx/includes/ssl-listen-443.conf
Copy and paste the following configuration:
ssl_certificate_key   /etc/ssl/private/adomain.com.key;
ssl_certificate       /etc/ssl/certs/adomain.com-fullchain.cer;

# SSL session rated A+ on https://www.ssllabs.com/ssltest on 2023/02/26
ssl_session_cache shared:SSL:10m;
ssl_session_timeout 10m;

ssl_ciphers EECDH+AESGCM:EDH+AESGCM;
ssl_ecdh_curve secp384r1;
ssl_session_tickets off;
ssl_stapling on;
ssl_stapling_verify on;

add_header Strict-Transport-Security "max-age=63072000; includeSubDomains; preload";
add_header X-Frame-Options DENY;
add_header X-Content-Type-Options nosniff;
add_header X-XSS-Protection "1; mode=block";

listen 443 ssl;
ssl_protocols TLSv1.2 TLSv1.3;
ssl_prefer_server_ciphers on;
As you can see, it points to the installed Let's Encrypt certificates.
Create a new site configuration:
sudo vim /etc/nginx/sites-available/adomain.com.conf
Copy and paste:
server {
  server_name adomain.com;
  include includes/ssl-listen-443.conf;

  index index.html;
  root /var/www/html/adomain.com/;

  access_log /var/log/nginx/adomain.com-access.log;
  error_log /var/log/nginx/adomain.com-error.log error;
}
The configuration includes the SSL/TLS configuration hosted in a separate file. This is very useful in case you generated a certificate for multiple domains, as it centralizes the shared SSL/TLS configuration.
Enable the website and reload Nginx:
sudo ln -s /etc/nginx/sites-available/adomain.com.conf /etc/nginx/sites-enabled/adomain.com
sudo systemctl reload nginx.service
Everything is set up we are now ready to receive HTTPS traffic from the world:
sudo ufw allow https
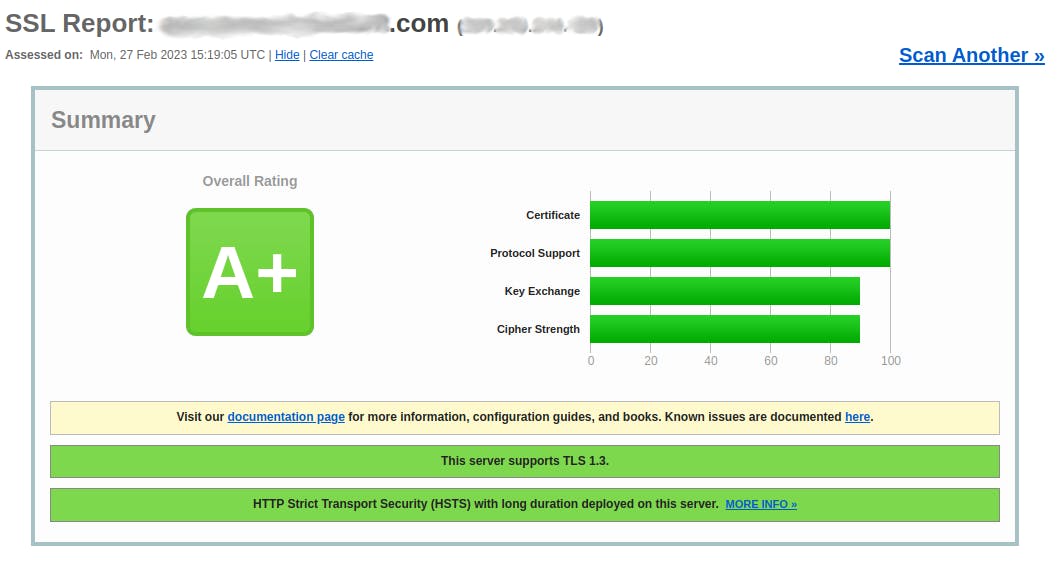
Audit SSL strength configuration
Congrats! Your website traffic is now secured with SSL/TLS encryption! However, not all SSL/TLS connections are created equal: there are different encryption algorithms (Ciphers) and SSL versions that provide a different level of security. Chiper algorithms are continuously improved or may be found vulnerable at some point. It is a good practice to regularly audit your server configuration using an external tool like SSL Labs.
The Nginx SSL/TLS configuration used in this post gives you an A+ rate (tested on 27/02/2023).
Closing up
I guess that many of you wanted to get a grasp on the topic or test HTTPS for the first time. If you are not interested to keep the setup running and you are about to terminate your VPS, hold on! Before doing that you must:
- Revoke the certificate:
sudo su
acme.sh --revoke --domain adomain.com
Delete the
ADNS record pointing to your VPS static IP.Finally terminate the VPS.
Instead, if you want to keep the setup, I suggest you to simulate the cron certificate renewal to check that is functioning as expected. Run the following command specifying the ---force parameter:
sudo su
/root/.acme.sh/acme.sh --cron --home "/root/.acme.sh" --force
Conclusions
We have successfully configured an Nginx server to allow secure HTTPS traffic and learned how to obtain and renew SSL/TLS certificates using acme.sh. Some of you may be wondering why I opted for acme.sh instead of certbot, which is recommended by Let's Encrypt. The reason is that certbot on Ubuntu has recently been distributed via Snap, a containerized environment that may not be suitable for production environments. On the other hand, acme.sh offers the same features as certbot and has the added advantage of being a Bash script that is compatible with any Linux distribution.